
Maintaining the transactional history of any user is very important. Explore the various session tracking mechanism (Cookies, HTTP Session).
Step 1: Create an OpenWeatherMap Account and Generate API Key
- Visit the OpenWeatherMap website (https://openweathermap.org/) and click on "Sign Up" or "Log In" to create an account or log into your existing account.
- Once logged in, navigate to your account dashboard.
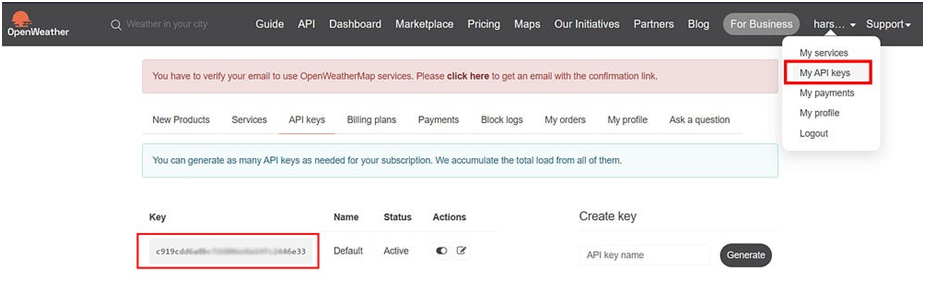
- From the dashboard, locate my API Keys section and click on "Create Key" or "API Keys" to generate a new API key.
- Provide a name for your API key (e.g., "WeatherApp") and click on the "Generate" or "Create" button.
- Your API key will be generated and displayed on the screen. Make sure to copy it as we will need it later.
Locate API key
Step 2: Set up a new React project
- Open your terminal or command prompt.
- Run the following command to create a new React project:
npxcreate-react-app weather-app
- Once the project is created, navigate into the project directory:
cd weather-app
Step 3: Install required packages
In the project directory, install the necessary packages by executing the following command
npm install axios
We will use the Axios library to make HTTP requests to the OpenWeatherMap API.
Step 4: Create a Weather component
- Inside the "src" directory, create a new file called "Weather.js" and open it in your code editor.
- Add the following code to define a functional component named Weather:
import React, { useEffect, useState } from 'react';

import axios from 'axios';


const Weather = () => {

  const [city, setCity] = useState('');

  const [weatherData, setWeatherData] = useState(null);


  const fetchData = async () => {

    try {

      const apiKey = 'c97c0c1086d42990e89d64d76f50bb61'; // Replace with your OpenWeatherMap API key

      const response = await axios.get(

        'https://api.openweathermap.org/data/2.5/weather?q=${city}&units=metric&appid=${apiKey}'

      );

      setWeatherData(response.data);

      console.log(response.data); //You can see all the weather data in console log

    } catch (error) {

console.error(error);

    }

  };


useEffect(() => {

fetchData();

  }, []);


  const handleInputChange = (e) => {

    setCity(e.target.value);

  };


  const handleSubmit = (e) => {

e.preventDefault();

fetchData();

  };


  return (

<div>

<form onSubmit={handleSubmit}>

<input

          type="text"

          placeholder="Enter city name"

          value={city}

          onChange={handleInputChange}

        />

<button type="submit">Get Weather</button>

</form>

      {weatherData ? (

<>

<h2>{weatherData.name}</h2>

<p>Temperature: {weatherData.main.temp} C</p>

<p>Description: {weatherData.weather[0].description}</p>

<p>Feels like : {weatherData.main.feels_like} C</p>

<p>Humidity : {weatherData.main.humidity}%</p>

<p>Pressure : {weatherData.main.pressure}</p>

<p>Wind Speed : {weatherData.wind.speed}m/s</p>

</>

      ) : (

<p>Loading weather data...</p>

      )}

</div>

  );

};


export default Weather;
Replace {YOUR_API_KEY} in the API URL with the API key you generated from OpenWeatherMap.
Step 5: Connect the Weather component to your app.
- Open the "App.js" file in the "src" directory.
- Replace the existing code with the following code:
import React from'react';

import Weather from'./Weather';


const App = () => {

return (

<div>

<h1>Weather Forecast App</h1>

<Weather />

</div>

  );

};


exportdefault App;
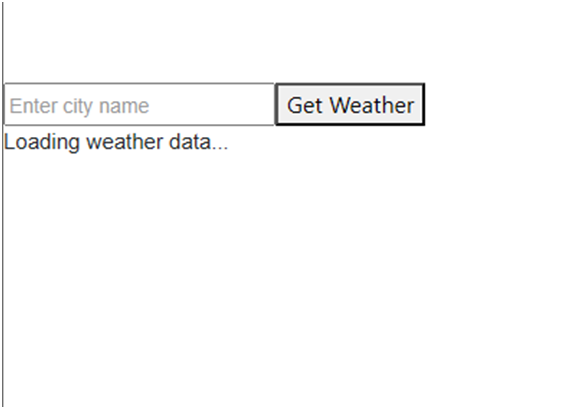
Your output should look like this:
Output :
Initial Screen
After Supply the City name
